
How To Easily Fill In Your Eyebrows The Right Way
Perfect brows are rarely born, and even if you have well-shaped brows, for a more visible change, brow color may help. Eyebrows are impressive! Something simple can turn into a disaster if you’re not careful. So, if you want to straighten your brows, you’ve come to the right place. We’ll show you how to fill in your brows step by step like a pro. Soon, you’ll be showing off your perfectly trimmed brows, learn how to create beautiful, feathery brows from the comfort of your home, read on!
How To Find Your Perfect Brow Shape
Picking the perfect eyebrow shape for your face requires knowing which shape works best for which face. It’s best to keep in mind the brow shape that best suits your face shape.
For starters, follow these steps to find the perfect shape:
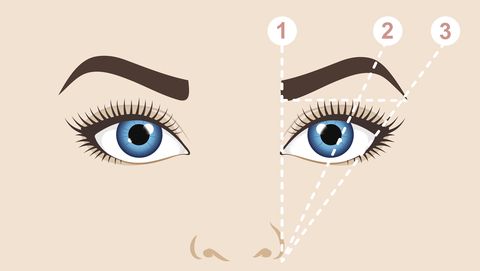
Step 1: Find the starting point
Draw a brow pencil from the side of the nose and inside the corner of the eye. This is your starting point.
Step 2: Find the Arch Point
Move the pencil guide from the inside corner to the center of the eyeball. Look straight; where the pencil meets your eyebrow when it’s on the side of your nose and in the middle of your eyeball is your bow point.
Step 3: Find the End Point
To find the end point, draw a line along the side of the nose and the outer end of the eye. This is the end of your eyebrows.
Connect the three points obtained by this method together and your brow shape will perfectly fit your face!
Some eyebrow and face shape combinations include:
- Round shape: high arched eyebrows
- Length: Straight low-lying arch
- Oval: flush eyebrows with a slight arch
- Square: Soft Arch
- Heart shape: Bushy straight eyebrows, rounded arches
How To Fill In Your Eyebrows
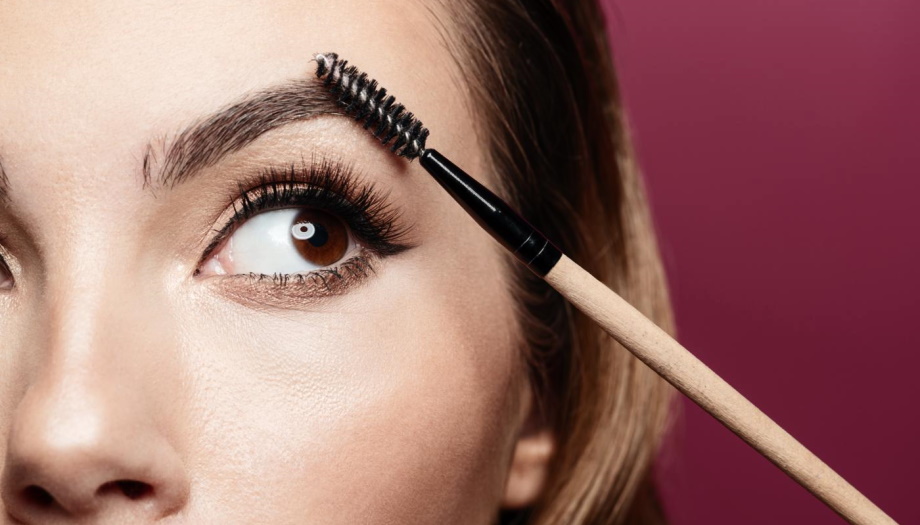
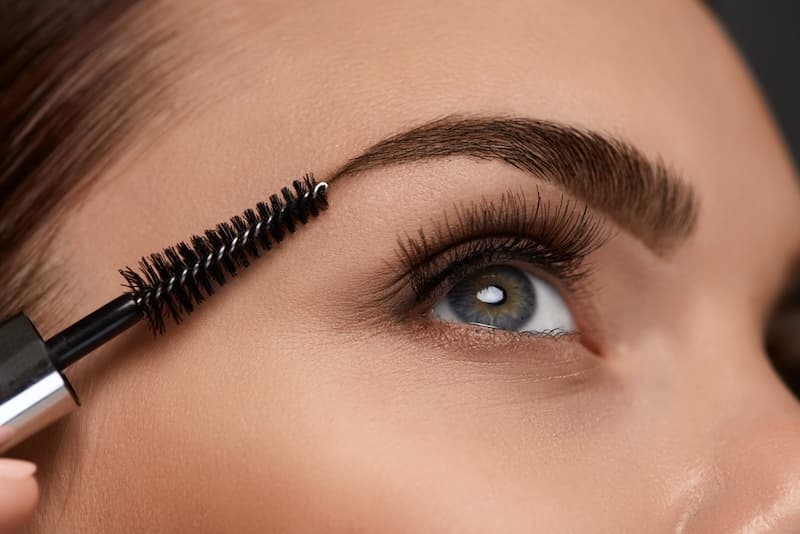
Step 1: Brush your brows
Sometimes, your brows just need a little brushing with a roller brush. Trim away any hair that’s not normal to give your brows the right look. It’s incredible how this step can make your brows look better in an instant.
Step 2: Start filling
Press the corner brush into the pressed powder on either side of the brow brush. Then knock off the excess powder before starting. This will reduce any powder that falls on your face and make sure you don’t put too much product on your brows. Then fill in the brows starting from the inner eye. I use a gentle pressing motion and start to pull up a little and the brush is tilted down. You want to mimic the strokes to make them look as natural as possible. If the hair in the area is growing, grow it upwards; if the hair is growing outwards, move in the same direction to keep it natural.
Step 3: Shape Your Body
Once the inside is filled in, you can start moving along the brow arch and outer brow. Add a little more padding to the arch for a more defined look. Again, keep hair growing in the same direction for a natural look. Start building the color and move outward to the ends of the brows. Fill in only the tops of the brows, not under the brows. This makes your eyes appear wider.
Step 4: Re-flash
Yes, swipe again. This helps soften the applied makeup a bit and blends nicely throughout the brow. Also allows you to see if you missed anything. Fill in any missing gaps you see.
Step 5: Brow Gloss
For big events, I like to put a little brow cream on my brows. This helps keep them in place and polishes them all.
What to Avoid While Filling in Eyebrows
Whether you’ve been doing brows for years or are just starting out, you should understand that brow makeup is an art. If you want to get the look you want, be patient and be ready to experiment. Some of the most common eyebrow-filling mistakes are listed below.
- Excessive eyebrow pulling
Each set of eyebrows has its own unique characteristics. Pulling your brows too much or too often can affect the appearance and shape of your brows. A thin layer of gel should be applied to the brows and stroked upwards to create the widest possible brows.
- You are using the wrong eyebrow product
Powders, hair oils, pencils, waxes, and gels can easily fill in brows, but your style and skill level will dictate which product you use. Pencils are ideal for filling bald spots. If you already have a hair oil, it’s great for thickening or deepening your brows. Waxes and gels are suitable for women with thicker eyebrows because they are lighter in color.
- One size fits all
When experimenting with brows, keep in mind that when it comes to filling in brows, brows are not always one size fits all!
- Using the wrong eyebrow shade
Use brow products that are lighter than your hair color. If your makeup is dark, it may appear rough or pronounced rather than natural and effortless.
- Too much makeup on your brush
When it comes to beautiful brows, even if you have sparse brows, you don’t need as much product as you might think. Focus on the finer parts of the brow, not the entire brow. To avoid looking heavy, don’t put too much makeup on the brush. Also, use a toothbrush, brow brush, or spoolie brush to light brush strokes.
- The space between the eyebrows is too prominent
Using the wrong color or formula, or overemphasizing the distance between your brows, has the potential to draw attention away from your brows.
- Your brows are filled with pencil before even grooming
The makeup process is easier and faster if you wax or thread your brows before filling them in.
- Change the brow shape
It is not common for us to draw unique shapes on our brows, such as squares. Look at pictures of your baby (pre-plucked, waxed, threading, etc.) to get an idea of what your brows should look like and stay within those boundaries.
Summary
If you have a round or oval face shape, brows with a lot of drama can be great. Skip the foundation and let your eyes do the talking! As always, practice makes you perfect – whether you use pencil, gel, or pomade for your brows, keep practicing and you’ll soon master the art of filling in your brows.